Free Instagram Reels Safe Zone Template (PNG Overlay)
Keep important content within the Instagram Reels and Stories safe zone with this set of free PNG Instagram Reels safe zone overlay templates that you can download and use in your editing software or on a monitor while filming. This free template is built and maintained by Rob Pinney Studio, a video production company in London. We use these overlays ourselves on every vertical edit we deliver.
Last updated: April 2026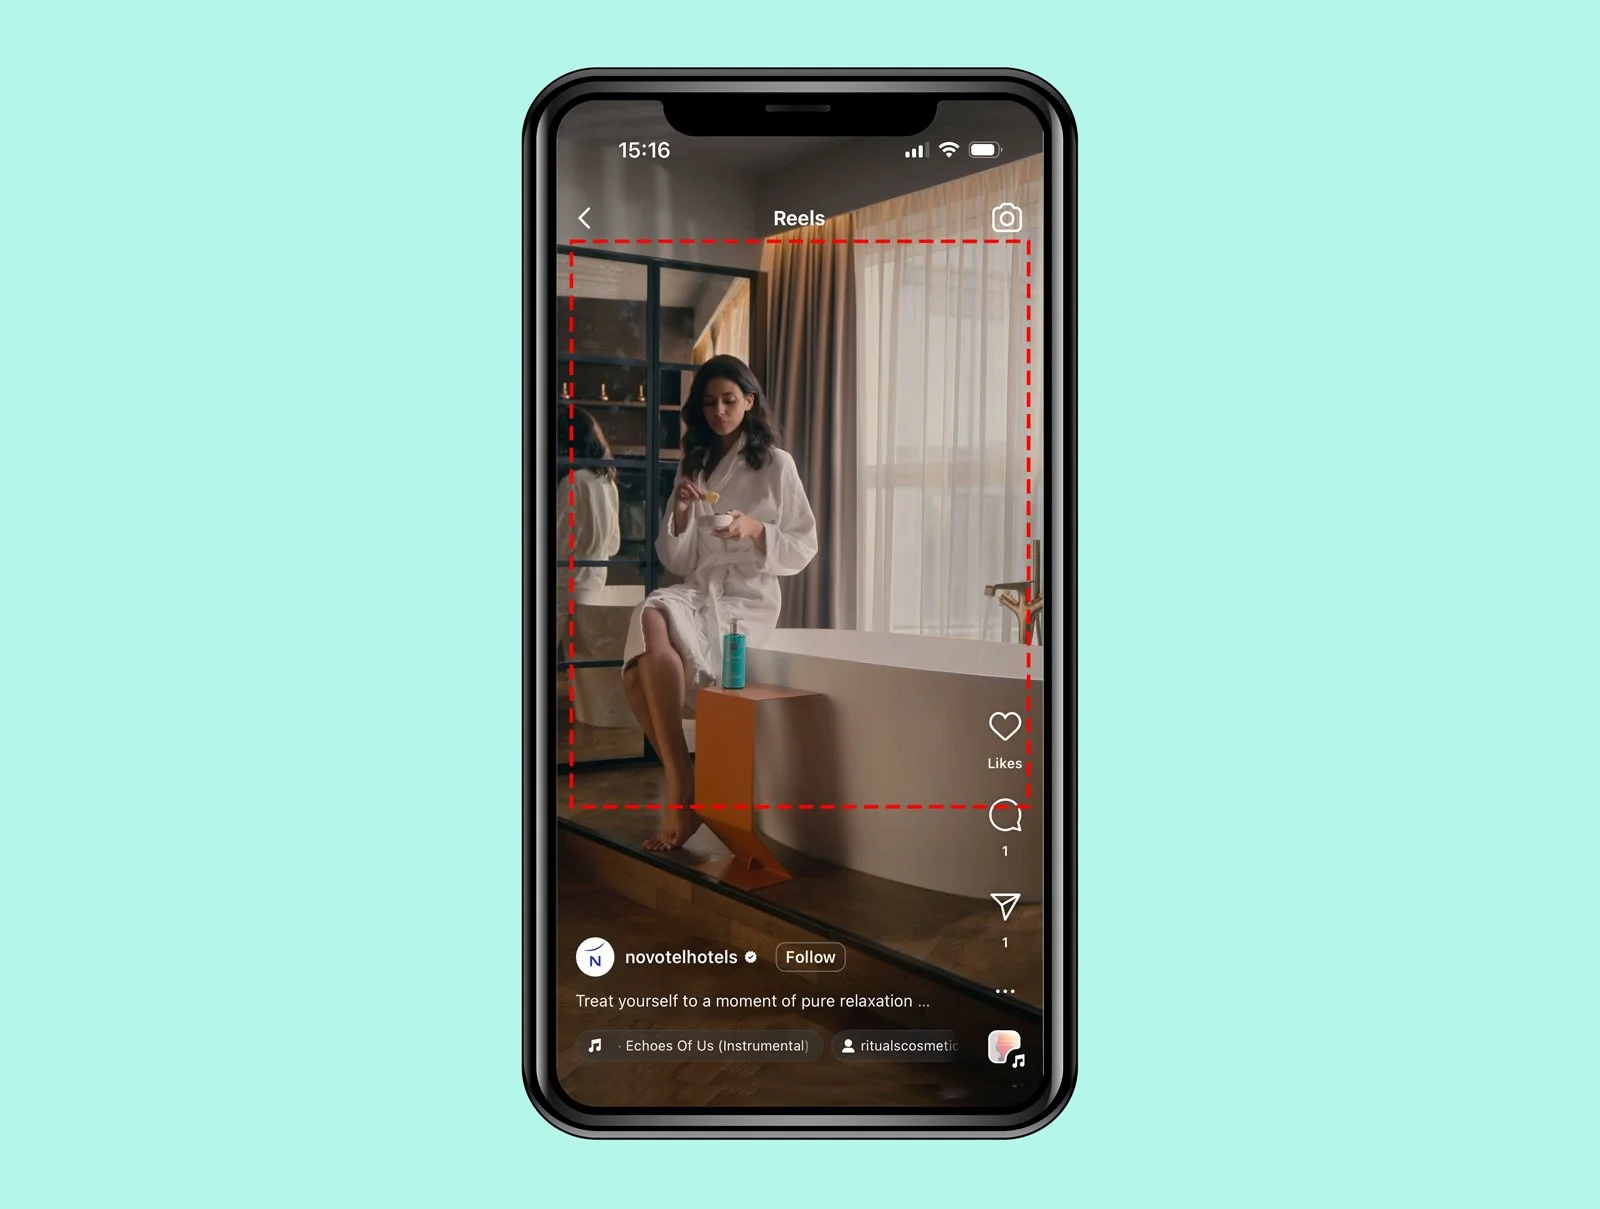
One of the templates in action. See more of our social media video projects.
Instagram safe zone templates
The Instagram Reels safe zone templates are PNG files with transparent backgrounds, so you can just drag and drop them onto your timeline above your footage to use as a framing guide. They will work in any NLE including Davinci Resolve, Premiere Pro and Final Cut Pro. You can find instructions on how to use them below.
Basic template
Simple safe zone template for Instagram Reels
Advanced template set
Full Instagram Reels safe zone PNG overlay template set with options for recommended caption placement and eye-line positioning
Full Instagram Stories safe zone overlay set with options for recommended positioning for speaking to camera
Full instructions and guidance on how to use all of the templates
Additional guide showing the default 4:3 profile feed crop
Used on 100+ client projects in 2025-6
Vertical video is here to stay, and delivering video projects in 9:16 alongside other formats has become a routine feature of almost every corporate and brand video project we work on. A quick look at these Instagram Reels statistics will tell you why. We use the advanced template set during production to make sure important content remains fully visible to the viewer. We hope you find them useful.
If you need vertical-ready footage shot professionally rather than just formatted, that's what we do — see our videographer services in London.
Instagram “safe zone” FAQ
What does “safe zone” mean on Instagram?
The Instagram “safe zone” is the area within your video frame where important things – like faces, text, and branding – are always visible and do not become obstructed by Instagram’s UI features.
When you watch a Reel on your phone, Instagram layers parts of their user interface on top of your video. The safe zone refers to the area on screen that is guaranteed to be fully visible to your audience once these have been added, and is where you should be positioning the most important parts of your frame.
Instagram Stories safe zone
Instagram Stories are also formatted for a 9:16 aspect ratio, but the Stories 9:16 safe zone is different to Instagram Reels. The Reels UI requires more clear space at the bottom to accommodate captions and button features, whereas the safe zone for Stories extends further down the screen. The advanced template set contains tailored PNG overlays for each format.
How to use the templates
The templates are very simple. They will show a red rectangle on top of your video so you can see where the safe zone is, making it easy to frame your most important content within that space. Or you can get the pro pack which offers a much more comprehensive set of guides.
If you use an external monitor while filming that allows you to apply custom overlays, you can also load the templates onto an SD card or hard drive to use on your monitor while shooting. We use them on SmallHD monitors and they work perfectly.
There are three basic templates:
The template marked EDIT is for 9:16 projects – so 2160×3840 or 1080×1920 and is for use in your editing software. If your source footage is in a different format, our free aspect ratio calculator converts any ratio — 9:16, 4:5, 1:1 — into exact pixel dimensions based on the camera originals.
The two templates marked MONITOR are for use on field monitors while recording. They are formatted for 16:9, but based on the assumption that you have rotated both your camera and monitor 90 degrees to shoot and show 9:16.
The monitor template marked UHD is for use when shooting 16:9 (3840x2160 or 1920x1080).
If you’re filming in RAW, your camera may default to DCI 4K – 4096x2160. In this case, use the monitor template marked 4K. This template is setup with that aspect ratio (1:1.90) in mind. Your delivery aspect ratio for Instagram Reels should still be 9:16, and once you’re editing on a timeline setup for 9:16 you should use the template marked EDIT for all purposes.
IMPORTANT!
Make sure you disable or delete the template overlay in your edit timeline before exporting.
Making the most of the templates
Centre the important parts of your frame: Keep the most important parts of your frame within the safe zone to guarantee their visibility across devices.
Avoid framing too close to the edges: Even within the safe zone, we’d recommend that you avoid putting anything too close to the sides. This is because different device screen sizes will show Reels slightly differently. Keeping things towards the center will help to mitigate the risk of unexpected cropping.
Test your film across different devices: Related to the point above, if you can you should try to check the appearance of your Reel on various devices and screen sizes just to make sure everything is where you want it to be.
Keep captions within the safe zone: If you’re adding captions to your film, keep these in the safe zone so that they don’t get obscured. It’s worth experimenting to find a balance between the placement of your captions and footage.
Make sure you test
Different mobile phones have different screen sizes, so before you publish your content, you should transfer it to a phone and double-check that everything looks right. If you begin the Instagram Reel upload process, you can watch your video as a preview. Alternatively, you can set up a separate Instagram account for testing and make it private – allowing you to see exactly how your content will look once published.
Get the pro templates
We provide premium video production services in London to our clients, and these are the advanced templates that we built for use in-house. We use them almost every day when editing content for Instagram.
The pack contains safe zone templates for Instagram Reels and Stories, complete with instructions. When you add them into your editing timeline, they allow you to visualise where the safe zone is, along with recommended caption placement, eye-line positioning, and a guide to the default 4:3 crop that will appear on your profile feed.

A set of easy-to-use PNG templates that allow you to see the “safe zone” for Instagram Reels and Stories in your editing software. Order now, delivered instantly via email.
We developed these templates in-house to solve a problem we were seeing all the time: titles, captions, and other critical parts of a video disappearing beneath the overlayed caption, or being hidden by the like, comment, re-post, and share buttons. We now use these templates all the time when editing social content for our clients, and they are especially useful when positioning captions and other text elements.
The templates are provided as easy-to-use PNG files. Simply drop the template onto your timeline above your footage and you’ll be able to see where to position your content to keep it clear. Different versions are included so that you can choose the one you like best. If they’re not what you expected, just email us for a full refund.
What’s included:
The PNG templates that allow you to see the safe zone for Instagram Reels and Stories in your editing software for all 9:16 resolutions including 4K and HD.
Versions that also indicate suggested eye-line and caption/text positioning, and the default crop that will appear on your profile grid.
Clean versions for both Reels and Stories that feature a translucent overlay only, for minimal distractions while editing.
A rotated safe zone template for Instagram Reels that can be used on an onboard monitor when oriented vertically
An instructions and best practices PDF
The full template pack will be delivered immediately by email after checkout.
FURTHER READING:
